


Have you ever removed your meat from the heat at the perfect temperature, only to find it looks overdone once you...

Bonaparte Barbecue's Brisket, Pork Ribs & Hot Links
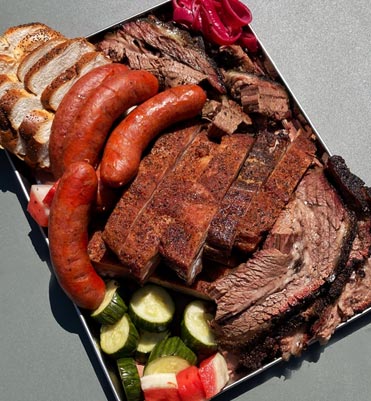
Bonaparte Barbecue won week one of Team Temperature’s Big BBQ Challenge with this incredible Texas Trinity platter: an impressive combination of beef brisket, St Louis pork ribs and hot links. A London-based company offering BBQ catering and classes, this guide by Bonaparte Barbecue is full of expert advice on how to smoke meat.
This Texas Trinity recipe is what our customers learn to make when they attend our classes. It’s also the most popular option for our event catering.
We aim to strip away all the flummery surrounding low and slow cooking and instead focus on the key fundamentals, helping to guarantee consistently great smoked meat. There are lots of misconceptions out there, along with over-complicated tricks and tips littering the internet; we hope our no-nonsense approach to this recipe helps you focus on what matters. Accurate temperature measurement is key to this process, and that is where Thermapen comes into its own.
00:00 hours. BBQ setup
Whatever BBQ you are cooking on (we use a bullet), make sure the temperature has stabilised before you put any meat on. Even when it hits your desired temp, ensure it flatlines and isn’t on the rise. For this recipe, we are looking to hit around 175 °C/350 °F as we are cooking hot and fast.
We use ProQ Cocoshell briquettes since they offer an extremely long and stable burn, this is especially important when cooking on a bullet compared to a ceramic BBQ. Don’t fret if the temperature is a little under; people tend to lose their minds and think that 10 °C will be the difference between success and failure. It won’t be. The cook may just take a little longer. And as long as you have a Thermapen to guide you, all will be well.
Once your coals are hot put your oak chunks on and wait until the smoke is clear. Many of our clinic attendees tell us that they put their meat on when plumes of grey smoke are puthering out, but this will lead to an acrid taste. Be patient and wait for it to settle to the sweet smell of oak smoke.
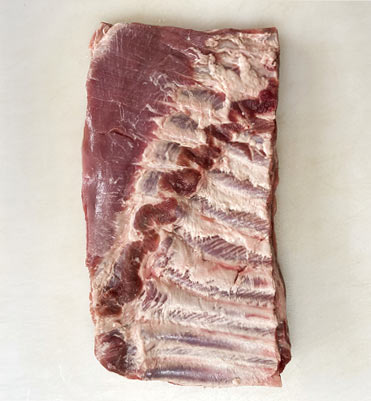
Trimming the brisket
Whilst you’re getting your BBQ to temp, you can trim and season your meat. We get ours from John Davidsons. He offers a great range and is the only supplier I know whose meat arrives at your door frozen rock solid, meaning you can order well in advance and stash it in the freezer until needed.
Given that brisket is no longer a cheap cut, you understandably won’t want to trim too much off. But it won’t go to waste, as this will find its way into your hot links. If you’ve been learning to barbecue on YouTube then you’ve no doubt been influenced by all the videos from competition smokers who trim the entire fat cap off. I’d err against this and it's certainly not promoted by smokehouses in Texas. Fat is flavourful, protects the meat, and still develops an amazing bark.
Typically, around 1cm of fat is left on and you only need to trim off hard fat that won’t render during the cooking process. After that, most of the trim is about shape and making it more aerodynamic, taking off any scrags and thin bits which will burn up and dry out. I'd recommend watching trimming videos from Chuds BBQ and Franklin Barbecue.

One thing worth remembering is to take a photo of the bottom so that you remember the direction of the grain as this is important when you slice it.
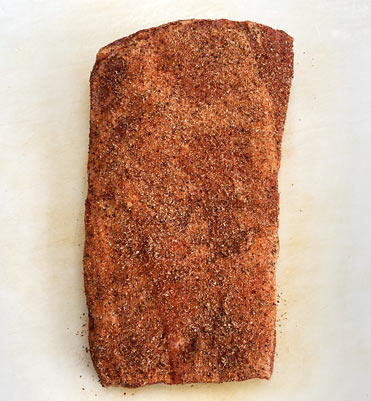
Seasoning the brisket
Put your trim in the fridge so that it's chilled for making the hot links. Now it's time to season the brisket. Typically, Texas brisket is equal parts coarse black pepper and salt. But you could also throw in some garlic and onion granules and play around with your flavour profiles.
Kosher salt is generally used alongside 16-mesh pepper. This is because they are a similar size, allowing for even distribution of seasoning from a shaker. We don’t use a binder for two reasons. One, it adds no additional flavour. Two, you don’t need to, your rub will stick without one.
Season from high up and be generous. This is a big bit of beef that requires a lot of seasoning.
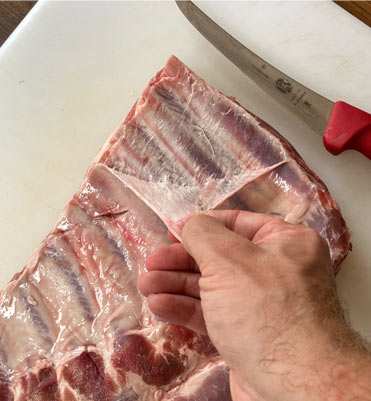
Preparing the ribs
Now to move on to your St Louis ribs. We prefer these to baby backs as they are fattier and more flavoursome.
Flip them over and take off the membrane. This is important as it won’t render and by removing it you help the rub penetrate the meat. You may find the butcher hasn’t removed the skirt on the underside and this is worth trimming or it will burn up. If the rack narrows too much at one end square it off and add to your trim in the fridge. Then apply your rub liberally. We use a 2:1:1 ratio of kosher salt, coarse pepper, and paprika.
01:00 hours. Putting the meat on the heat
Now it's time to put the meat on. With our bullet, we put the brisket (fat-side up) on the top rack and the ribs below (meat-side up). This is so the brisket is further away from the heat source and because we don’t want anything dripping on the brisket and preventing the bark from forming.
When you put the meat on, the temperature will drop. Don't panic. Give it time and the temperature will climb back to its previous level as the meat warms up. Get to know your gear and how it behaves, and only intervene and tweak the vents when necessary.
A word of warning, be wary of relying on built-in thermometers; they are notoriously unreliable. Instead use a Thermapen to guarantee a quick, accurate, and trackable read. You can also use a leave-in thermometer like the Smoke. This will enable you to keep track of your pit and meat temperatures at the same time.
02:00 hours. Preparing the hot links
Having trimmed your brisket and ribs, you will have a sizeable amount of meat for your hot links. 2kg will make around 16 sausages. You never know how much you’ll end up with so it's worth having some beef chuck or pork shoulder in the fridge just in case you’re a bit light. You are aiming for an 80:20 meat-to-fat ratio.
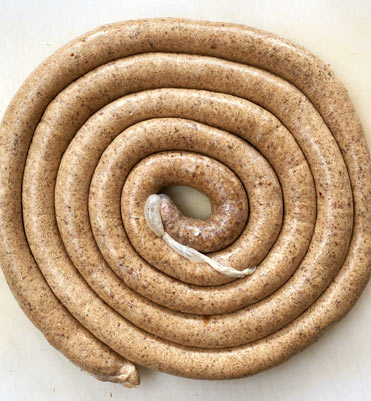
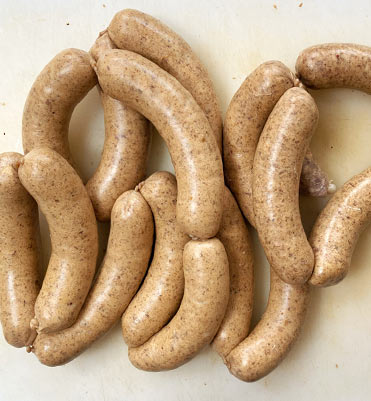
The day before, put your hog casings in water to soak and soften overnight; we use natural casings with a 36/40mm diameter. Put the chilled trim through a coarse grind and then add your seasoning mix (milk powder 4%, salt 2%, paprika 1%, Korean red pepper flakes 1%, pepper 1%, garlic granules 1%, curing salt 0.25% of the weight of meat/fat).
We use milk powder as a binder which means this is a really meaty sausage, unlike those bulked out with rusk. It also includes curing salt, which gives the sausage its vibrant pink colour, alongside the paprika and red pepper flakes.
When you’re finished, it’s time to make the links. The simplest way is to hold the untied end in one hand and pinch about 6 inches further down. Then keep flipping the newly formed sausage over until the casing becomes taught. For the next one, pinch another 6 inches further along but don’t flip, instead pinch again 6 inches further down and flip what will become the third sausage. So, every other sausage gets flipped. Keep repeating until the end and finally tie off. Keep refrigerated until ready to cook.
03:00 hours. Avoid spritzing
With the meat having been on for two hours, you’ll be tempted to peek or spritz. Do not! All this will achieve is disrupting your pit temperature. We don’t even spritz on low and slow cooks since we find it interrupts the bark development but doesn't affect the moisture of the meat (this comes down to intramuscular fat).
Instead, crack on with making your sides and sauces. Or have a shower and change your clothes as you probably reek of smoke and sweat!
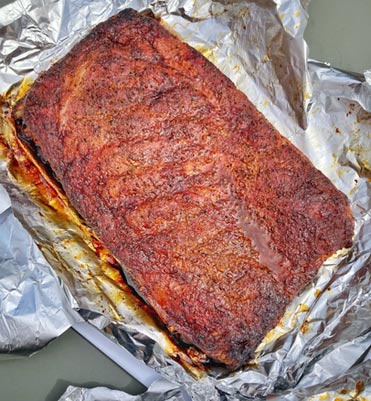
04:00 hours. Wrapping the brisket and ribs
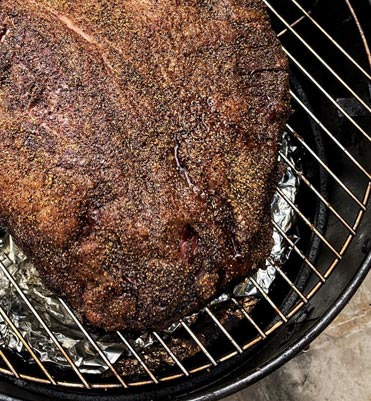
Use your Thermapen to test the brisket for temp. It should be around 82 °C/180 °F in the point and 70 °C/160 °F in the flat. You also need to test the bark. When you touch it, it should feel dry and not come off. You also want it to be a mahogany colour. At this point the brisket is ready for the Texas crutch, which is a foil wrap.
Lay out two overlapping 1m strips of extra wide and strong foil. Place your brisket in the middle, fat-side up. Fold the far end towards you, over the brisket, and flatten down the side flaps. Then do the same to the near end. The sides can now be folded up. Crimp the foil so that it's nice and snug, removing any air pockets so that the brisket doesn’t steam. Zavala Barbecue has a few videos demonstrating this really simple method.
Now for a controversial moment. With the brisket wrapped in foil, it is not being smoked. That means all we want to achieve are stable temps until it is ready.
Rather than burn through your coal supplies trying to maintain a hot 175 °C/350 °F and having to keep an eye for any peaks or troughs, I suggest you put it in the oven, giving you one less thing to think about.
With the brisket wrapped it is now the turn of the ribs. Follow the same procedure, just use less foil, but drizzle a simple sugar syrup in the middle of the foil before placing them meat-side down and wrapping snugly. You can now reduce your BBQ temp to 120 °C/248 °F and return them to the smoker meat-side down so that they can bathe in the syrup and juices. You could also play with no-wrap ribs. These will have a bit more bark and bite to them and are great on particularly fatty ribs as it promotes caramelisation.
05:00 hours. Beer time
Reward yourself with a beer. We love Offset Brewery’s Low 'n' Slow Pale Ale as it's specially brewed to be paired with smoked meat.
Put a few wood chunks in the smoker so that they can burn clean in time for the hot links.
06:00 hours. Testing the brisket
Cut your links into individual sausages and put them in the smoker.
The first guide as to whether or not the brisket is ready is the internal temperature.
Because this is a hot and fast brisket, it will likely be at around 98 °C/208 °F. Ignore all those recipes that claim 93 °C/200 °F is the sweet spot, this would only really apply to a low and slow cook.
Most people pull their brisket too early because they panic and worry about overcooking it. But in fact, an overcooked brisket is far better than an undercooked one. Your Thermapen is the best piece of kit for this as you can probe across the entire brisket, with the important read being in the thickest part of the flat. The point will take care of itself, but the flat is the tricky bit. Probe through the foil but take care not to pierce the bottom. This is where having it in the oven is useful as it gets back up to temperature quickly once the door is closed.
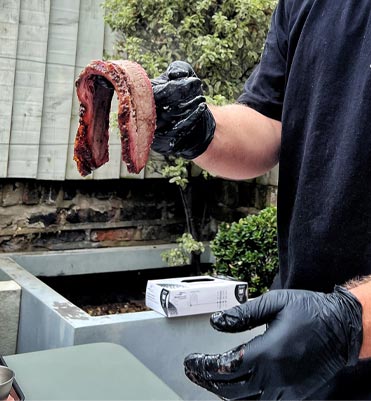
Once you have tested the temperature, the next gauge is tug. Again, use your Thermapen for this. When you probe the flat, the key to knowing when it's done is that there must not be any tug or resistance when you remove it. Be patient, and if in doubt leave it a bit longer.
The final test is to pick up the brisket. It should feel loose and bendy, not stiff. When the brisket has passed both the temp and tug tests it's time to open up the foil to let it rest. Don't keep it covered or you risk overcooking it. The hotter you cook, the greater the overcook, so this is more of an issue with a hot and fast than with a low and slow.
Let the internal temperature fall to 63 °C/145 °F. If your guests are still some way off, re-wrap it in new foil once the temperature has dropped and hot hold it in your oven at the same temperature. But keep the juice and fat that has collected in the original foil: this stuff is gold.
Finishing the pork ribs
Your pork ribs will now be done. Open up the foil and return to the smoker meat side-up so that the bark can firm up a bit after the wrap. If you chose not to wrap, you can now apply a bit of sugar syrup to add a light glaze and some sweetness. To test them, your Thermapen should be able to pierce the meat without applying any force. Also, give your hot links a turn.
07:00 hours. Assembling the platter
If you want to add a bit of theatre, you can now build your tray in front of your guests. Place the ribs meat-side down on your chopping board. This reveals the bones and will allow you to cut neat slices parallel to them. Ribs always look good when stacked, so arrange a row of five and then stack another row on top, perpendicular to the first.
Now for the showstopper. Position the brisket horizontally on the board, with the flat on your right (if right-handed) and the point on your left. Begin slicing the flat from right to left.
Remember that photo I asked you to take? Use this as your guide to slice against that grain. Slice about ¼ inch wide.
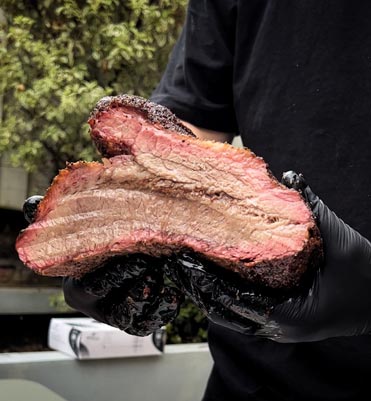
When you're about five slices in it's time for the ‘pull test’. Lift the slice from one end and hold it in front of your guests. It should hold under its own weight.
Then, use your other hand to pull it. It should break with little effort or tug. Then it's the ‘bend test’. Place a slice over your index finger and it should flop right over. Sit back and soak up the adulation from your salivating guests.
As you continue to slice, eventually you will see two muscles, the flat on the bottom and the point on the top. When the point begins to dominate, you can lift the brisket and turn it to show your guests the oozing, dripping rendered fat cascading down the meat like a waterfall.
Once they have finished drooling, turn the point end to face you and slice. About halfway through slicing the point, you reach another money shot, where the point will be all floppy as you raise it triumphantly. Again, Chuds and Franklin both have excellent videos to help you visualise this.
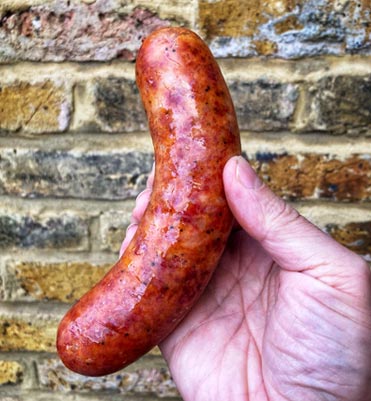
Finally, you can retrieve your hot links from the smoker and pile them on high. They should probe above 71 °C/160 °F.
We love to serve our trays with pickled cucumber, red onion, watermelon, and shiitake. This helps to cut through the rich, fatty meat. And on the side, we serve a South East Asian slaw, cheese grits, and a beef tallow brioche.
"Thermapens are an essential bit of kit for smoking meat. At Bonaparte Barbecue, we use the Classic, DOT and Signals to ensure that our temps are stable and we pull our meat at just the right time. Tug and temp are the two key indicators, and Thermapen probes are the perfect tool for both."
Related posts
 Mike Tomkins’ Rib of Beef with Potato Terrine Chips & Charred Hispi Cabbage
We’re really excited to be working with MasterChef finalist 2021 Mike Tomkins on bringing you some incredible recipes...
Read more
Roast topside of beef with Yorkshire puddings
There’s nothing more comforting than a delicious roast topside of beef with lashings of gravy and a big ol’ Yorkshire...
Read more
Mike Tomkins’ Hunter’s Chicken
Hunter’s chicken is a wonderful thing. Juicy chicken, oozing with cheese, encased in salty bacon and glazed with...
Read more
Mike Tomkins' Jerk Chicken Supreme
Inspired by a recent trip to Jamaica, this vibrant recipe by Mike Tomkins is full of beautiful colours and flavours....
Read more
Kenny Tutt's Roast Goose with Mulled Plums
Rich, perfectly cooked roast goose and sweet, festive mulled plums make the perfect pairing in this Christmas recipe...
Read more
Search
Categories
- Baking (34)
- BBQ (81)
- Autumn (14)
- Cheap Eats (9)
- Sweet Treats (38)
- Tips, Advice & Info (77)
- Christmas (35)
- Drinks (1)
- Thermapen Father's Day Recipes (17)
- Team Temperature (23)
- Date Night (37)
- Celebrations (20)
- Family & Kids (9)
- Fish (21)
- Low & Slow (11)
- Meat (138) click
-
Chefs (128)
click
- Kenny Tutt (16)
- Richard Holden (16)
- Barbechoo (5)
- Only Slaggin (1)
- SoSaSe Chocolat (1)
- Genevieve Taylor (5)
- Becky Excell (2)
- Charlotte Stirling-Reed (3)
- The Smokin Elk (12)
- Marcus Bawdon (2)
- Thermapen Chef (25)
- Edd Kimber (2)
- Humble Plates (7)
- Simon May (4)
- The Hedgecombers (3)
- Billy & Jack (4)
- Perfectly Preserved (3)
- Mike Tomkins (19)
- DJ BBQ (2)
- Nick Nairn (4)
- Air Fryer (9)
- RFX (3)
Latest recipes
")
Why Meat Keeps Cooking as It Rests (And What to Do About It)
Read more

Smoked Pork Belly Tacos with Candied Jalapenos
Read more
There’s nothing like tender smoked pork belly piled into soft tacos, especially when topped with tart homemade...

Cowboy Butter BBQ Tomahawk Steak
Read more
Reverse-seared tomahawk steak cooked on the BBQ. Served with a rich and flavourful cowboy butter sauce.

BBQ Pulled Pork Tacos
Read more
Smoky, tender pulled pork cooked on the BBQ. Served in soft tacos with homemade salsa and spicy mayo.

Mediterranean Pulled Lamb Flatbreads
Read more
Slow-cooked shredded lamb leg. Served in warm flatbreads with salad and tzatziki.
Archive
Popular Recipes
Why Meat Keeps Cooking as It Rests (And What to Do About It)
Have you ever removed your meat from the heat at the perfect temperature, only to find it looks overdone once you...
Read more
Smoked Pork Belly Tacos with Candied Jalapenos
There’s nothing like tender smoked pork belly piled into soft tacos, especially when topped with tart homemade...
Read more
Cowboy Butter BBQ Tomahawk Steak
Reverse-seared tomahawk steak cooked on the BBQ. Served with a rich and flavourful cowboy butter sauce.
Read more
BBQ Pulled Pork Tacos
Smoky, tender pulled pork cooked on the BBQ. Served in soft tacos with homemade salsa and spicy mayo.
Read more
Mediterranean Pulled Lamb Flatbreads
Slow-cooked shredded lamb leg. Served in warm flatbreads with salad and tzatziki.
Read more